If you’re thinking about trying acrylic painting on canvas, you’re in good company. It’s a fun and approachable way to get creative, even if you’ve never picked up a brush before. Acrylics are a solid choice for beginners because they’re pretty forgiving, dry fast, and won’t make a mess of your workspace. There’s something truly relaxing about putting color on canvas, even if you have no clue what you’re doing at first. I’ll walk you through the basics, must-have supplies, and some handy tips so you can start your acrylic painting adventure without feeling lost.
Getting to Know Acrylic Paints
Acrylic paints are waterbased pigments that dry quickly to a flexible plastic finish. That means your painting doesn’t have to wait days to dry like oils, plus they’re a lot less stinky. Cleanup is simple; just use water and soap. Acrylics can be used thin like watercolor or built up thick for some serious texture. You have tons of options and can mix them to create nearly any color you can dream up.
Here are a few things to keep in mind about how acrylics behave:
- Fast Drying: You can layer quickly, but you need to work fast if you want to blend colors right on the canvas.
- Eye-Catching Colors: Acrylics pop, and they stay bright over time, keeping your artwork vibrant.
- Versatility: You can use them on canvas, paper, wood, or even fabric for different projects.
Because acrylics dry so quickly, you don’t have to wait between steps. This lets you experiment, change directions, and build up your painting in stages. The fast-drying quality is ideal for layering, whether you’re creating soft backgrounds or bold shapes. Acrylics hold their own on a variety of surfaces, so once you get comfortable on canvas, you can try painting on wood panels, paper, or other materials for even more creative possibilities.
The Basic Supplies You’ll Want for Acrylic Painting
You don’t have to splurge to get started, in fact most of these supplies can be purchased at dollar tree , but it helps to have a few reliable supplies within reach. Here’s what I always keep nearby:
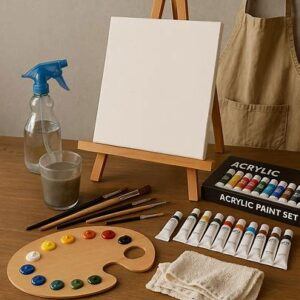
- Canvas: Go for stretched canvas or canvas panels. If you’re brand new, smaller sizes are easier to handle and less intimidating.
- Acrylic Paint Set: A beginner set comes with all the essential colors, and sometimes even a few extra shades. You can mix anything missing.
- Brushes: Get a pack with a mix of flat and round shapes in various sizes. Synthetic brushes put to work with acrylics and last well.
- Palette: Use a plastic, glass, or disposable palette for mixing colors. Even a clean plate does the job if you need it.
- Water Cup: For rinsing brushes; nothing fancy is required.
- Rags or Paper Towels: Super useful for blotting brushes and handling little messes.
- Apron or Old T-shirt: Acrylics will stain clothes once dry, so a coverup is a smart move.
- Easel (Optional): Not required, but working upright sometimes makes things easier on your neck and back.
As you continue, you might stumble upon some extras like sponges, palette knives, and even toothpicks for special effects. It’s handy to have different surfaces on hand; try painting on canvas board, thick watercolor paper, or even wood to see how each brings out a new side of your art.
Getting Set Up and Ready to Paint
Before you squeeze out any paint, setting up your workspace makes a huge difference. Pick a spot where you won’t worry about splatters. Cover your table with newspaper or a plastic sheet and keep your supplies within arm’s reach. Good lighting helps you see your colors accurately, and honestly, it just makes painting more fun.
I like to keep an extra water cup just for clean water—one for rinsing, one for thinning paint. This keeps your colors from getting muddy too fast. It also helps to have a sheet of scrap paper nearby for testing color mixes before they hit the canvas. Organization at the start means you can relax and get into the flow once you start painting.
First Steps: Playing with Acrylic Techniques
There’s no single right way to use acrylics, but a few simple techniques can help you get a good feel for them:
- Flat Wash: Mix a bit of water into your paint and pull it smoothly across the canvas for a flat area of color, which is great for backgrounds.
- Dry Brush: Take just a bit of paint on a dry brush and use a light touch to get that scratchy, textured look. This is perfect for adding highlights or texture to grass and fur.
- Blending: Acrylics dry fast, but you can still blend edges by working quickly. A misting spray bottle can help keep the paint workable for a little longer on the canvas.
- Layering: Let one layer dry fully and then paint on top. You can build up complex colors and interesting textures this way, especially when playing with thick paint.
- Stippling: Use the tip of the brush to tap dots of color for a speckled effect. This technique is nice for leaves or creating highlights on textured objects.
The best way to learn is by experimenting. Cover a small canvas or practice paper with sample patches and see what happens when you change how much water you use, switch up brushes, or layer colors. Remember, your paint doesn’t have to look “good” right away; every brushstroke teaches you something new.
Some Beginner Friendly Project Ideas
Starting small helps you build confidence and get a feel for the materials. Here are a few ideas that are approachable and perfect for easing into your first painting:
- Try a simple landscape with bold blocks of color, such as a sunset or rolling green hills.
- Create abstract shapes or color swatches; there are no rules here, just focus on color-mixing fun.
- Outline and fill in basic flowers, leaves, or plants for a botanical vibe.
- Paint silhouette shapes against a colorful background, such as tree outlines or city skylines at dusk.
If you want extra guidance, check out free step-by-step tutorials on YouTube. Just search for “easy acrylic painting for beginners,” and you’ll track down dozens of beginner-friendly projects to follow along with.
Another way to learn is by joining acrylic painting communities online. You’ll pick up tips, get feedback, and see what other beginners and experienced artists are working on. Sharing your work—even if it’s rough—can give you a boost in confidence and help you see your progress over time.
Handling Common Acrylic Painting Challenges
Even with a simple setup, you’ll run into a few snags. Here are some classic beginner headaches and what I do to work around them:
- Paint drying on the palette: Squeeze out small amounts of paint at a time and cover your palette with plastic wrap during breaks. Or use a “stay wet” palette if you really get into it.
- Colors turning muddy: Clean your brush well every time you switch colors. It feels tedious, but it pays off when your colors stay bright.
- Paint not covering the canvas: If it looks streaky, use a little less water or switch to a thicker brush. Two thin coats often do better than one heavy coat.
- Hard edges when you want soft blends: Keep a spray bottle handy and lightly mist the surface. You can also blend with a clean, damp brush.
Everyone faces these little struggles. Most of the fun is figuring out new solutions as you paint!
Level Up Tips for More Confident Painting
After finishing a few projects, you might want to branch out and try some new approaches. Here’s what works well:
Use reference photos: Print out pictures or pull them up on your phone. They help take the stress out of drawing shapes and picking colors.
Experiment with palettes: Limit yourself to three to five colors and see how creative you can be by mixing new shades from just those.
Try acrylic mediums: Acrylic mediums let you change the texture of your paint or slow the drying time. Gel medium thickens paint for 3D effects, while glazing medium helps you build transparent layers of color.
Varnish your finished canvas: Adding a coat of acrylic varnish makes the colors pop and keeps dust off the surface. Just be sure your painting is totally dry before you do it.
Don’t stress about making your art look “realistic.” Sometimes it’s more fun to crank up your colors, exaggerate shapes, or go with your own style altogether. Every artist starts somewhere, and every painting, whether it goes as planned or not, teaches you something useful for next time.
If you want to take things up a notch, try combining acrylics with other media, like colored pencils, oil pastels, or collage elements. Mixing in some variety keeps things fresh and lets you explore new looks as you build your confidence.
Why Pick Acrylics Over Other Paints?
I honestly think acrylics are the popular choice for most beginners. Oil paints are beautiful but take ages to dry, and you need strong-smelling solvents. Watercolor is lovely but less forgiving—they can get muddy quickly if you’re not careful. Acrylics dry fast, clean up with water, and let you play with pretty much any style. You don’t have to follow strict “acrylic painting rules.” Feel free to mix in pencils, pastels, or even collage materials once you get the hang of it.
Plus, the affordability and convenience of acrylics make them an easy pick for hobbyists. The paints are widely available, and once you build your starter kit, you can keep adding new colors and tools as your skills grow. Many artists return to acrylics again and again because they make experimenting simple and stress-free.
Frequently Asked Questions
Do I need to prep my canvas before painting?
Most canvases for sale in stores are already “primed” with gesso and ready to use. If you’re unsure, check the label. Extra layers of gesso can make the surface smoother if you want to get fancy, but for most beginner projects, you can start painting right away.
How do I keep acrylic paint from drying so fast?
You can work in smaller sections, mist your palette regularly with water, or try a slowdry medium mixed into your paint. Covered palettes hold onto moisture too, giving you a little more working time before your paints set up.
Are acrylic paints safe for kids?
Acrylics are nontoxic once dry, but I always double-check the manufacturer’s advice and make sure little ones wear old clothes or aprons, just in case.
What should I do with leftover paint?
It’s a great idea to cover your palette and use leftovers next time, or brush extra paint onto scrap paper for future collage work. Dry acrylic paint shouldn’t go down the sink; scrape it into the trash once it sets up.
Can acrylic paintings be hung without glass?
Definitely. Once your painting is dry and varnished, you can hang it as is. The varnish helps protect it from dust and minor scratches, so there’s no need for glass unless you’re looking for a specific display style.
Final Thoughts
Jumping into acrylic painting on canvas is about playing with color, trying new ideas, and letting yourself learn as you go. You don’t have to follow rules or stress about making a masterpiece with your first try. The more you practice, the more your confidence and creativity grow. Acrylics offer freedom; grab some paint, pick a canvas, and just see what happens. No experience is needed, and each painting moves you closer to your own style. Have fun, stay loose, and don’t let a blank canvas hold you back. The memories and satisfaction you gain from painting are worth every splash of color you put down!